§ How-To
How to Choose the Right Chainsaw Chain Using Pitch, Gauge, and Drive Links
Learn how to read the three critical chain measurements — pitch, gauge, and drive-link count — so you can order the correct replacement chain every time.
Published · Last updated:
Ordering a replacement chainsaw chain shouldn’t feel like guesswork, but it often does. Walk into a hardware shop or open a parts listing online and you’ll see chains described by a string of numbers — 3/8”, .050”, 56DL — that can look baffling if you’ve never had to decode them before. The truth is, once you understand three measurements, you can confidently match a replacement chain to any bar and saw combination. Those three numbers are pitch, gauge, and drive-link count. Get all three right and the chain will fit perfectly. Get even one wrong and you’ll end up with a chain that won’t mount, won’t tension properly, or wears out far too quickly.
What Is Pitch?
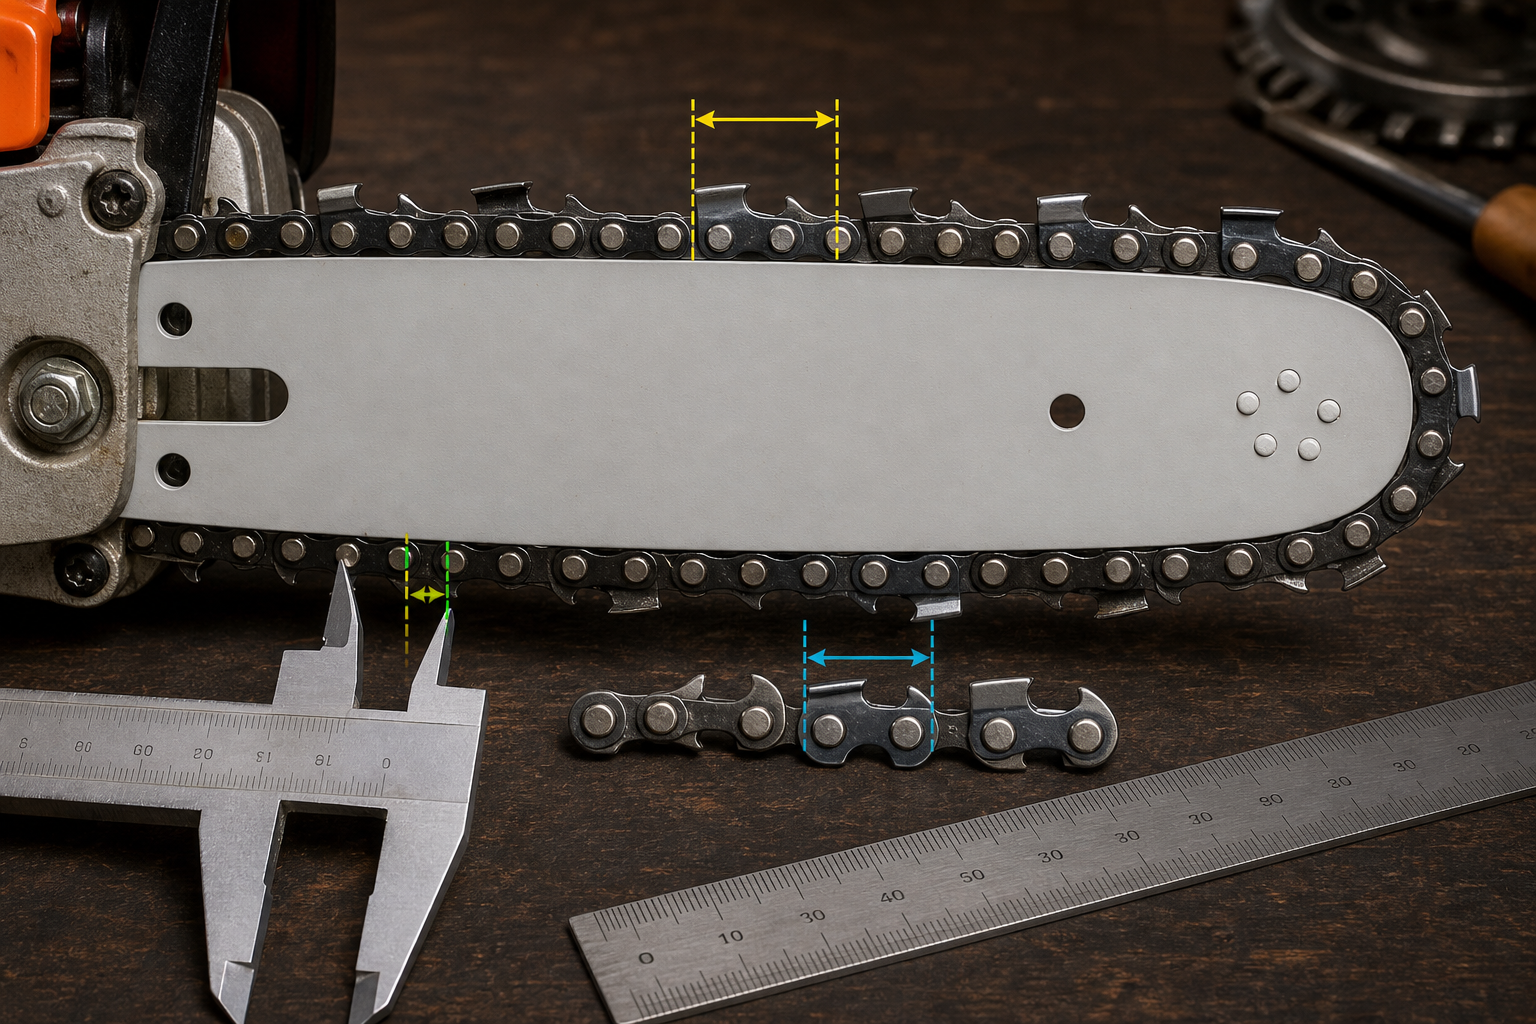
Pitch is the distance between the chain’s rivets, and it determines how the chain meshes with the drive sprocket on the saw and the nose sprocket on the bar. It’s measured by taking the distance between any three consecutive rivets and dividing by two.
You don’t normally need to measure pitch yourself. It’s almost always stamped on the guide bar near the mounting slot, printed in the saw’s owner manual, or marked on the old chain’s packaging.
The most common pitch sizes you’ll encounter on homeowner and semi-professional saws are:
- 1/4” — found on small battery-powered saws, pole saws, and mini chainsaws
- 3/8” Low Profile (3/8” LP) — the most common pitch on homeowner electric and petrol saws
- 0.325” — used on mid-range semi-professional saws
- 3/8” (full) — used on larger professional saws
- 0.404” — heavy-duty professional chains
If the pitch doesn’t match your sprocket, the chain simply won’t engage. It’s non-negotiable.
What Is Gauge?
Gauge is the thickness of the drive links — the small tabs on the bottom of the chain that ride inside the bar groove. It must match the width of the groove in your guide bar. If the gauge is too thick, the chain binds and overheats. If it’s too thin, the chain wobbles in the groove, wears unevenly, and can derail.
Common gauge sizes are:
- 0.043” (1.1 mm) — lightweight battery saws and small bars
- 0.050” (1.3 mm) — the most popular gauge for homeowner saws
- 0.058” (1.5 mm) — mid-range and professional saws
- 0.063” (1.6 mm) — heavy professional saws
Gauge is usually stamped on the bar alongside pitch. If it’s not visible, you can check gauge with a simple trick: try sliding a coin or feeler gauge into the bar groove. A 1p coin is roughly 1.5 mm thick, which is close to 0.058” gauge. If it fits snugly, that’s your gauge. If it’s too tight, you likely have 0.050”. This isn’t a precision method, but it narrows the options quickly.
What Is Drive-Link Count?
The drive-link count is simply the total number of drive links around the entire chain loop. It’s the number that determines whether the chain is the right length for your bar.
Two chains can share the same pitch and gauge but have different drive-link counts. That happens because different bar lengths — and sometimes different bar designs at the same nominal length — require different loop sizes.
To count drive links:
- Remove the chain from the saw if possible
- Lay it flat and identify the drive links (the downward-pointing tabs)
- Mark one link with tape or a marker
- Count every drive link around the loop until you return to the marked one
Common drive-link counts for popular bar lengths include:
- 10” bar: 39–40 DL
- 12” bar: 44–45 DL
- 14” bar: 49–52 DL
- 16” bar: 55–57 DL
- 18” bar: 62–64 DL
- 20” bar: 70–72 DL
These ranges vary by pitch, gauge, and bar manufacturer. That’s why counting your actual chain is always more reliable than guessing from the bar length alone.
Where to Find All Three Numbers
Before you order, gather all three specs. Here’s where to look:
- Guide bar stamp — Most bars have pitch, gauge, and sometimes drive-link count stamped or printed near the bar mount end. Look for small numbers grouped together.
- Owner’s manual — The saw manufacturer’s chain specification table will list the correct chain for each bar option.
- Old chain packaging — If you kept the box or wrapper from the previous chain, all four specs (including bar length) are usually printed on it.
- The chain itself — Some chains have small markings stamped on the drive links indicating pitch and gauge, though these can be hard to read on a worn chain.
If the bar stamp is worn away and you don’t have the manual, measuring pitch and gauge directly from the old chain is still straightforward. Pitch: measure centre-to-centre across three rivets, divide by two. Gauge: measure the thickness of a drive link with a calliper.
Common Mistakes When Choosing by Numbers
A few pitfalls come up again and again in owner forums:
- Matching bar length only. A “16-inch chain” is not a universal size. You need pitch, gauge, and drive-link count as well.
- Confusing 3/8” full with 3/8” Low Profile. These are different pitches even though the number looks similar. Low Profile chains have smaller cutters and thinner drive links, designed for lighter saws. Mixing them up means the chain won’t sit on the sprocket correctly.
- Using a chain from another saw. Even two saws from the same brand can use different chain specs if the bars differ. Always check the bar, not just the saw model.
- Rounding drive-link count. If you counted 56, order 56 — not 55 or 57. There’s no tolerance here.
What to Look for in a Replacement
Once you have your pitch, gauge, and drive-link count, finding a replacement chain or a bar-and-chain combo is straightforward. Look for exact-match replacement chains that list all three specs clearly. Quality replacement chains and bar combos should specify these numbers up front, so you can cross-reference them against your bar stamp and be confident the fit is right before the parcel arrives.

Find the right part on Amazon
Check price, stock and fitment — ships direct from Amazon.
§ Parts